Sometimes it is not possible to use the built-in Dynamic DNS features of a router. This can be due to limitations of the router firmware, lack of support for certain DNS providers, or simply because you want more control over the process. Some ISPs also do not expose your IP address via the router interface, making it impossible to use the built-in DynDNS features.
If you want to access your home server, security camera, or remote desktop from outside your local network, but your ISP assigns you a dynamic IP address that changes regularly, Dynamic DNS (DynDNS) is the solution.
With DynDNS, you can link a memorable hostname, like dyndns.example.com, to your currently assigned IP, which is updated whenever it changes.
How Does DynDNS Work?#
- IP Detection: A service detects your current public IP address
- Comparison: The system checks if the IP has changed
- DNS Update: If the IP has changed, the DNS entry is automatically updated
- Always Accessible: Your domain always points to the current IP
Why is the IP Changed Regularly?#
- ISP cost savings: Dynamic IPs are cheaper than static ones
- IPv4 scarcity: There aren’t enough IPv4 addresses for everyone
- DHCP Standard: Internet providers use the DHCP protocol, which distributes IP addresses from a pool
Why Build Your Own DynDNS?#
Most internet providers assign dynamic IP addresses that change regularly. Commercial DynDNS services often cost money or have limitations. With your own solution, you get:
- Full control over your DNS entries
- No monthly costs (only the domain)
- Unlimited subdomains without extra charges
- Integration into existing automations
- Privacy: Your DNS provider never sees your IP history or knows when your IP changes
Why Track DNS Changes?#
When you use a commercial DynDNS provider, they have complete visibility into your IP history - every change is logged on their servers. By running your own DynDNS service, you maintain complete control and privacy:
- Own Your Data: Your IP change history stays on your infrastructure, not with a third-party service
- Provider Cannot Track: Your DNS provider only sees static DNS records, not the automation or IP changes behind them
- No Surveillance: No external service has a timeline of when you’re online, offline, or moving between locations
- Security: Detect unauthorized DNS modifications or IP hijacking attempts with your own logs
- Debugging: Identify connectivity issues by reviewing your IP change history
- Monitoring: Understand your ISP’s IP rotation patterns and plan accordingly
- Alerts: Get notified immediately if DNS updates fail, preventing service downtime
With this approach, you keep sensitive information about your infrastructure and connectivity patterns completely private.
Prerequisites#
For this setup, you’ll need:
- A domain with DNS API access (e.g., deSEC, Hetzner, Cloudflare, etc.)
- An automation tool (e.g., Node-RED, n8n, Home Assistant, etc.)
- API token from your DNS provider
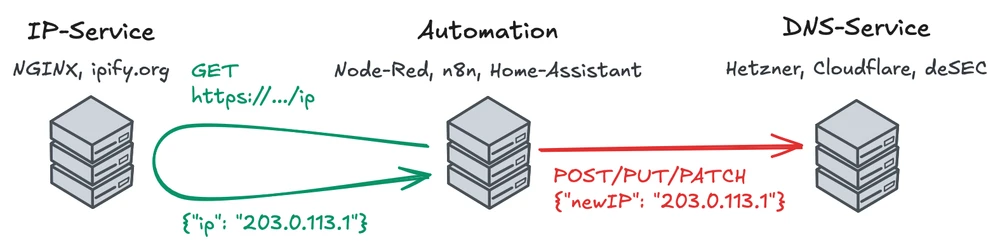
The Architecture#
Our DynDNS system consists of several components:
Detection Service#
Your own Nginx service like https://unjx.de/ip or public services like ipify.org
This is the crucial part that detects your current public IP address. As the service sits outside your local network, it sees the public IP assigned by your ISP. We simply return this IP in a JSON format.
Automation Tool#
A workflow/flow that monitors IP changes and updates DNS. This is the heart of your DynDNS system. It regularly queries the IP detection service, compares the result with the last known IP, and triggers a DNS update if a change is detected.
DNS Provider API#
Automatically updates the DNS entries via the DNS provider’s API. Most DNS providers offer APIs to manage DNS records programmatically. The automation tool uses this API to update the DNS records whenever a change in the public IP is detected.
IP Detection Service with Nginx#
We’ll implement IP detection with Nginx. Nginx can directly return the public IP address of the requesting client without any additional code.
Nginx Configuration#
Create a nginx.conf with the following content:
server {
    listen 8080;

    location = /ip {
        default_type application/json;
        return 200 "{\"ip\":\"$http_x_real_ip\"}";
    }
}The $http_x_real_ip header is set by the reverse proxy and contains the real client IP.
Docker Compose Setup#
Create a docker-compose.yml to start the Nginx service:
services:
  ip-service:
    image: nginxinc/nginx-unprivileged:alpine
    volumes:
      - ./nginx.conf:/etc/nginx/conf.d/default.conf:ro
    ports:
      - 8080:8080
Start Nginx#
# Start with Docker Compose
docker compose up -d

# Service runs on http://localhost:8080
curl http://localhost:8080/ip
HTTPS and Reverse Proxy Setup#
The Nginx service runs on port 8080 without HTTPS. For production environments, you should use a reverse proxy like Caddy or Nginx to add HTTPS support.
Building the Automation Workflow#
The automation is the heart of your DynDNS system. The workflow runs regularly and automatically updates DNS entries when IP changes are detected.
Use any tool that you want:
- Cron
- Node-Red
- n8n
- Home Assistant
Workflow Steps (Tool-Independent)#
- Timer: Run every 1-5 minutes
- IP Query: HTTP GET to IP service
- Comparison: New IP vs. Stored IP
- Decision:
- No change? → Exit
- Change? → Go to next step
- DNS Update: HTTP POST/PUT/PATCH to DNS provider API
- Success Check: Check HTTP status
- Save: Store new IP for next comparison
- Error Handling: Notify on errors & log
Workflow Configuration#
Choose time interval:
- 1-2 Min: For critical services (higher API consumption)
- 5 Min: Recommended - good balance
- 15-30 Min: If uptime is less critical
Implement error handling:
- Retry on API errors (2-3 attempts)
- Notifications on failure (Email/Webhook)
- Save logs for diagnosis
Protect sensitive data:
- Store API tokens in Secrets/Credentials (not hardcoded)
- Use separate tokens only for DNS operations
- Rotate tokens regularly